Archive
iOS 8.1.2 Update Results
The latest iOS release from Cupertino alerted me via my iPhone 5, on the evening of December 21st, 2014. I find that a bit odd, especially since it’s been out since December 9th, 2014. Possibly it’s a staggered release? For pure curiosity reasons, if you were alerted sooner, post in the comments when you were notified and your device type.
Whenever there is a new release or update I always feel compelled to checkout what’s new at KBA HT1222. There was nothing new regarding iOS security, not even a publicly documented anti-malware update. This is a small update so I decided to have a little fun comparing the duration it takes to get patched between an iPhone 5 Model MD636LL/A and iPad Air Model MD785LL/A.
The Update
This update is focused on restoring lost ringtones purchased from iTunes Store. Fortunately for me I don’t buy ringtones so I’m unaffected. If you or someone you know needs to restore their lost ringtones, they can do so by navigating to this link from the device itself. For the folks out there who like to use technology the way you want to, attempting to open that link from a non-iOS device will result in iTunes being requested to launch. At a minimum, you will be promoted for iTunes to be launched and you can cancel. Your experience may vary depending upon how you are configured. Click for yourself below.

Choosing to go further into the unknown, the locally installed iTunes app will launch revealing the image below.
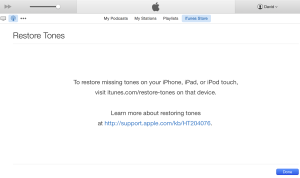 For fun, I surfed to the iTunes Restore Tones link from a Samsung Tab 3 I use for testing. The page redirected to the “Download iTunes Free” download page. Not surprisingly, there is no option to install iTunes on Android. Kind of a fruitless exercise, but it didn’t take long to enter into a mobile browser to see the behavior.
Update results
I used Online-Stopwatch from the Samsung Tab 3 to get an estimated duration to apply the patch untethered. The start point was from accepting the EULA bound to pressing “Download and Install”. The patch for an iPhone running 8.1.1 is 28.2MB in size, which is not very large. I began the update prior to catching the size of the total update to iOS 8.1.2 for this phone. I believe this iPhone 5 was at iOS 8.1. The total upgrade time took roughly 11 minutes and 30 seconds over a 802.11b/g/n wireless encrypted 2.4GHz WiFi network. Traffic encryption is configured for WPA2-PSK (AES). There were 2 restarts prior to the device returning to a usable state in sleep mode. Pressing the Home button woke the iPhone 5 up but the passcode entry response time was very sluggish. Resulting in an error during entry due to the slow confirmation of the masked characters. Clearly there won’t be any noticeable UX changes for me because I don’t purchase ringtones.
Performing the same 8.1.2 update on a test iPad Air, using the same network and method as described above, took 19 minutes and 33 seconds to complete past the “Preparing Update…” status. This would feel reasonable for a patch that’s 364MB in size. The restart to update the firmware (the Apple logo on a black background) took 25 minutes and 48 seconds, according to Online-Stopwatch. The iPad Air was usable after a total of 26 minutes and 51 seconds. Passcode entry was not sluggish. Again, no UX behavior changes.
Conclusion
While there still are many iOS users waiting for WiFi and battery drainage issues to be resolved, at least some of you got your ringtones back. Nonetheless, applying updates to any device you own/manage is one very important part of staying secure. Call it a best practice of risk reduction. While 8.1.2 doesn’t have any publicly documented security updates, if you have the time, always lean to the side of best practices. If you don’t have the time, find a gap and work patching into your holistic device security posture maintenance routine. I don’t consider the performance results described in this article to be the best results or even to be used as a benchmark, simply the results I experienced. Your mileage my vary, especially if you are not updating from iOS 8.1.1. Please share any variances you find within the comments below. TIA!
For a different review, I suggest reading GottaBe Mobile Adam Mill’s articles “iOS 8.1.2 Review: Is It Worth Installing?” and “iPad iOS 8.1.2 Update: What You Need to Know“.
No security, no privacy. Know security, know privacy.
Kippo Honeypot BotNet Takedown
Kippo Honeypot BotNet Takedown
I wanted to post this over here as well for some folks who may have missed the Kippo Honeypot BotNet Takedown article released this past Friday at Barracuda Labs. This article has a lot of technical details for anyone looking to get down and dirty. You can also click the link to download the technical transcript I received from an unnamed source I called “Bob” for the article.
Please leave comments here or at the Barracuda Labs blog site.
Thanks again for stopping by.
My reaction to the Twitter white and gray color scheme. Looks too much like Apple.

This was the surprise I got when I logged into Twitter today. Not the smut, the white and gray color scheme. Too much like the brand in the image above.

Reboot Router
I have been giving a talk on “ZeuS Command & Control for Tech Support” that whimsically uses a Trojan horse type of malware to solve commonly reported computer issues. The concept arose from regularly being asked to help friends, family and others fix their computers because I enjoy it.
There may have been a point much earlier in my career when that was true.
Time permitting, not that there is much time to spare, I still do get a warm and fuzzy feeling inside helping out friends. Family is a more complex matter, because it’s you. They know your flaws, secrets, and don’t give a fuck. “Just fix the thing!” “You’re not very patient!” “Why are you so rude!” And several other exclamatory explicatives would be apart of the typical “customer service” engagement.
I decided to share this in a blog because while on a business trip and dealing with delayed flights, resulting in missed connections, adding in a city not on the original itinerary and hours of delays due to “lovely” Chicago weather; my wonderful wife asked me to help her reboot the at&t gateway for U-verse to get back online.
Having noticed earlier in the day that the SSL VPN I run from my home, the gateway to SchwartzNet Labs, was down. I sent her a couple unanswered text messages to confirm that the unresponsive SSL VPN and Minecraft server were not on fire. Children were crying.
She eventually replied to the email I sent her on the same topic confirming…
the tubz were downz.
She called at&t where they confirmed that there was a network outage in the area due to harsh weather. She needed to reboot the router for everything to come back online. OK, simple enough.
Please keep in mind that my wife is self-admittedly “low tech.” I love her dearly and that this isn’t an insult to her, but rather a comedic tale of how even ZeuS Command & Control for Tech Support couldn’t have helped. She edited this article to her approval prior to publishing.
On this night of SchwartzNet Labs doomsday, she had to get online by midnight and of course…watch her DVR’ed shows. While I waited inside the Los Angeles airport for the air vessel to be ready to receive it’s new human cargo, this was the SMS exchange we had to reboot the router.

After the final SMS in this exchange, I decided to call her and go old school using a smartphone to talk her through the process. By the time she answered her smartphone, the router was already powering up. Everything worked perfectly!
I hope you enjoyed this comedic glimpse into my personal life and how us “techies” can learn to be a bit more patient with our customers.
Especially when the customers are our loved ones.
No security, no privacy. Know security, know privacy.
BSides Joint Task Force CTF – Detroit Office – Challenge 64 “Flipping Out”
This was an awesome challenge! One my favorite because it had the right amount of clues, pushed my ability to think through a problem and interpersonal collaboration with fellow InfoSec pros in the Midwest community. This is my first CTF so I don’t have any prior experience with this format and am looking at these challenges with “new eyes”.
The challenge was to find the secrets hidden in a JPEG image file by a rogue agent of the BSides Joint Task Force (BSJTS). The JPEG was named ‘hackers.jpg’ which is from the 1995 movie Hackers.

Flipping Out image
Based on past challenges from the BSJTF, I knew I needed to do a little recon about the movie. I heard of the movie “Hackers“, and can guess what it’s about, but I never saw it. That being the case, unless they seeded it with false data, Wikipedia is my friend.
In the challenge description there were vague references to the movie characters names, “Acid Burn”, “The Phantom Phreak”, “Cereal Killer”, and “Lord Nikon”. I kept this information in the back of my mind as possible clues for later on to use as passwords, assuming the file contained concealed writing in the form of steganography.
I ran the file through photo forensic tests, inverted the colors with GIMP, as well as a couple other tests. Where I got the best clue of what to do next was with Hex Fiend. With hex editors I look at the beginning and end of files to check for changes. The beginning of the ‘hackers.jpg’ file looked kosher because it contained the proper file header ‘JFIF’ on the first line which indicates it’s a JPEG file format.
The end of the file had more clues as you can see from the image below.

First clue found in Hex Fiend
As you can see from the screenshot, I was searching in the text strings of the file for the word ‘flag’, but I also searched for ‘key’, ‘hacker’, ‘hint’, ‘txt, ‘jpg’ and ‘==’ at different periods during the challenge. ‘jpg’ came up as a search result four times.
The bottom of the ‘hackers.jpg’ file has a reference to the file named ‘image1.jpg’ which usually (but not always) means another file was embedded inside the ‘hackers.jpg’ file. I opened ‘hackers.jpg, with Ez7z (7zip app for Mac OS X) and saw the following:

Sweet progress! Opening ‘image1.jpg’ revealed this:

Embedded file removed using 7zip
Nothing better than a slap in the face when you think you done good. Opening ‘image1.jpg’ in Ez7z and Hex Fiend didn’t result in any discoveries. It looked like stego was the way to go. All tests were a bunch of dead ends. This is where I can say being nice to people and getting to know your fellow community members is important. You never know when you might need a helping hand.
Honorary mention: I met @DrBearSec at BSidesChicago 2013 for the first time. We’ve seen each others tweets on Twitter but that was about it. Since BSidesChicago, we have both been participating in the BSJTF CTF and as a result, we’ve tweeted to each other more frequently. While working on this challenge it was great to bounce ideas off of each other. @DrBearSec has never given me a flag and has acted more like a mentor providing hints. Because of his willingness to be a mentor, I have learned more and never gave up. During this challenge he gave me a hint about the ‘image1.jpg’ file being a red herring and indeed it was. Thank you Bear!
Turning focus back onto the ‘hackers.jpg’ file I ran it through all of the same tests as the ‘image1.jpg’ file. The description for this challenge used the word ‘flip’ twice, plus it’s in the title. Considering the possibility that the bits of the file were flipped, I turned back to Hex Fiend and saw that the last two characters are ‘KP’. ‘PK’ is the file header identifier for the ZIP file format. Now the search was one to flip the bits and open the ZIP file.
I’m not a developer and pretty weak at scripting so I had to turn to the web for help. I found a Python script that reads a file and flips the last line to the beginning of the file. The results were less than optimal. Hex Fiend showed the file header as
00 01 89 ED 00 01 7B F9 04 2F FA E2 42 B0 56 DB 00 08 00 00 00 14 04 03 4B 50 âÌ {˘ /˙‚B∞V€ KP
The letters ‘PK’ are not at the beginning of the file but further inward. It was Memorial Day weekend and I wanted to play with my kids. I got back to the file on Monday night after 11pm central time. The challenge was ending Tuesday morning at 8am central time and there was less than 9 hours left to finish, assuming no sleep. Pressure was on.
Hunting through search results I came across a tool that reverses the bytes of a file. Surprisingly it’s called ‘reverse.exe’. If you aren’t a coder and you like CTFs, you may want to find this tool. ;0)
Using a Mac, this means it’s time to fire up a Windows VM to flip the file around. The resulting file I opened with Ez7z and saw this:

Pay dirt! I like how the name of the image file was also flipped so it wasn’t obviously found when looking at the hex data. When this file was extracted it resulted in this goofy image.

CTF Flag
Thank you BSJTF for such a fun and solvable challenge!!
Cloud storage data risks and encryption
On March 8th, 2012 I submitted a blog titled “Cloud storage data risks and encryption” at Naked Security pointing out the risks associated with using cloud storage providers such as Dropbox. To be clear, I’m not suggesting to move away from such services, but to augment them with a layer of encryption which you can control. That is exactly how I use them.
For example using SafeGuard PrivateCrypto for standalone free file based encryption use or SafeGuard Encryption for Cloud Storage if you are looking for enterprise class software such as SafeGuard Enterprise.
I’m excited for mid-2012 when the smartphone encrypted file readers will be available. Definitely a sweet integration point there.
I hope you enjoy the blog article and please comment either here at DSPN or Naked Security. If you make a reasonable comment which invokes the need for me to reply, I will make every attempt to engage you in a conversation.
Until next time, keep it safe and secure online.
Sophos Disk Encryption for Mac & FileVault 2 Comparison
If you have read my previous review of Apple’s FileVault 2, thank you.
This article is an updated version of my Lion FileVault 2 review to include a comparison of Sophos Disk Encryption for Macs. Enjoy.

History has shown that some things Apple does, Microsoft does later. I don’t want to distract you with the details so when you are done reading this blog posting, fire up your favorite search engine and hunt on ‘Microsoft copies Apple’. Enjoy!
This doesn’t hold true when it comes to Full Disk Encryption (FDE). BitLocker made it’s debut with Vista in January of 2007. A mere 4 and a half years later we have FileVault 2 (FV2) with FDE support for the Apple Mac OS X. Yipee!
Being the data protection junkie I am, as soon as possible, I upgraded to OS X 10.7 Lion to encrypt my MacBook Pro.
Sophos is also able to encrypted Mac computers at the sector level. As a comparitive, I also encrypted the same MacBook Pro using Sophos Disk Encryption (SDE) for Mac version 5.55 on OS X Lion.
This way, from a hardware perspective, everything is equal.
The objective was to give FV2 a test drive, see how it feels as well as share my data findings and opinion when compared to SDE for Mac version 5.55.
Keeping with the Apple theme, I’ve rated my observations with either CRISPY or ROTTEN based on my opinion of the finding. Personally, my favorite apple is a cool crisp Senshu in mid-September. Yum!
The Hardware
MacBook Pro 13-inch
Released: Early 2011
1 Processor: 2.7 GHz Intel Core i7
Total number of cores: 2
Memory: 4 GB 1333 MHz DDR3 both slots used
Storage: 500 GB SATA drive ST9500325ASG 5400 rpm
Format: Mac OS Extended (Journaled)
The Act of Encryption
FV2: Apple has a very useful article (HT4790) on how to get your FileVault 2 FDE on. My advice is to read through the article first before giving it a try to ensure there are no surprises on your system.
I found the article easy to follow and salacious enough to satisfy my technical curiosities. A great example is the first sentence of the article which states that FileVault 2 is using XTS-AES 128-bit encryption.
If you’re a crypto junkie or learning to be one, you can get your fix with this great Wikipedia page on Disk encryption theory where you will learn about cipher block chaining (CBC) and Xor-Encrypt-Xor (XEX).
If acronyms such as XTS and AES make your eyes glaze over, then keep reading because article HT4790 softens up the crypto-speak to be helpful enough for home users or IT pros without a cryptography background.
SDE: Sophos provides the standard Apple Disk Image (.dmg) file which contains a Readme.html and a package (.pkg) file.
The pkg file can be used for a manual installation or can be distributed for large scale deployments using tools such as JAMF’s Casper.
For enterprises, there are several command line (CLI) options available for the deployment. Not in scope of this article. Point being, you can really customize the heck out of your install.
Comparative: I searched for a way to deploy FV2 and SDE in enterprises and came up with JAMF can be used for both, but SDE offers many more options using the CLI.
Options such as adding users to the pre-boot, generating recovery keys and controlling encryption state. CRISPY for SDE.
With my 500 GB SATA drive and minimal usage during initial encryption it took roughly 7 hours at a rate of 1.19 GB/minute. This was nice and CRISPY for FV2. Keep in mind that’s 128 bit crypto.
Under the same usage conditions, SDE took 12 hours and 26 minutes at a rate of 0.67 GB/minute. While SDE’s initial encryption time is longer, the ability to pause and resume the act of encryption as often as you like makes up for it.
As you can see, with twice the key strength the initial encryption times will take longer, but with twice the protection.

FileVault estimating the amount of time to complete encryption
I performed a couple additional tests in the area of the encryption resiliency.
About 5 minutes after the initial encryption process began I restarted the MacBook Pro. I did the same thing during the decryption process for both technologies.
I was very happy to see my MacBook Pro come back to life and not turn into a half-encrypted Franken-brick. CRISPY to both FV2 and SDE.
Another cool feature I find with very few encryption products is the ability to manually or script a pause, resume and/or revert the initial encryption process.
FV2: I was happy to see that after enabling FV2, I was also able to revert/disable FV2 in mid-encryption, but only once.
SDE: SDE has the same ability to begin encryption and while partially through, then decrypt. Where SDE comes ahead is you can stop decryption before completion and even go back and forth again as often as you like.
That’s awesome!
While I still don’t have a use case to turn it on and off multiple times, it goes to show that there was a lot of thought in SDE’s design.
Comparative: In the event when someone decides to jump into the FDE pool and forgot to backup with Time Machine beforehand having an exit strategy is a relief.
It’s always good to backup before you encrypt your drive, you can never be to cautious.
I give them both a CRISPY for being able to back out of initial encryption, but SDE gets a double-byte CRUNCH for adding the extra features to pause and resume.
Performance
Performance is generally a top priority for the majority of Mac users. When your time is spent manipulating images, recording/editing audio, compiling iOS apps and/or rendering video, speed and available resources counts.
That’s generally why you got a Mac to begin with.
Right?
Updated: After having completed this article I’ve decrypted my drive because the performance hit was too great to bare. I found whenever launching and using GIMP and even when using Finder, I got the rainbow wheel of patience.
A big thanks to AnandTech who put in a great effort to analyze performance with FileVault 2 enabled on an SSD (Solid State Drive). After analyzing various I/O intensive operations, including but not limited to, random read/writes and sequential read/writes at varying file access sizes, they wrote, “Overall the hit on pure I/O performance is in the 20 – 30% range.” ROTTEN
This level of analysis is still pending with SDE. If AnandTech desires to execute the same performance analysis on SDE, please contact me directly for assistance.
I decided to do some tests of my own around boot times. After all, apart of the pleasure I get with my MacBook Pro is how well it performs when opening and closing the lid.
It’s important to keep in mind that when you add drive encryption, for best protection you want to shut down. No more sleep mode for me.
*Boot times were recorded using an iPhone 3Gs Clock app with stopwatch feature. Keeping things level on the Apple technology playing field.
Hopefully making the data easier to read, I used a matrix.
FileVault 2 Boot Times Matrix
| FV2 State | Encryption State | Boot type | Time to (in seconds) | ||||
|---|---|---|---|---|---|---|---|
| POA | Login | Usable | Total | Increase | |||
| OFF | OFF | Cold | N/A | 46.4 | 12.3s | 58.97s | N/A |
| ON | Not started | Warm | 10s | N/A | 98.6s | 108.6s | 49.63s |
| ON | Started | Cold | 10s | N/A | 78.4s | 88.4s | 29.43s |
| ON | Completed | Cold | 10s | N/A | 83.9s | 93.9s | 34.93s |
FV2 State means if FileVault 2 was enabled or not
POA means Power-On Authentication
Time To POA means the time it took to get to POA for authentication
Time To Login means the time elapsed after POA to get to a Mac OS X login prompt
Time to Usable means until Mac OS X 10.7 was usable. To keep things fair, I used a script that Automator launched at boot. When the called application presented a password prompt Mac OS was considered to be usable.
Total = POA + Login + Usable
Increase means the time added to the overall boot process
The average of three boot attempts is the value presented in each matrix. As you can see, the average boot time with no encryption took just under 59 seconds. This number is subtracted from the Total boot times recorded to get the Increase in boot times.
After initial encryption completes, the overall boot time increase for FV2 is 34.93 seconds.
Some people may argue this with me, but considering that Apple controls the operating system and the source code this is pretty ROTTEN
Sophos Disk Encryption for Mac Boot Times Matrix
| SDE State | Encryption State | Boot type | Time to (in seconds) | ||||
|---|---|---|---|---|---|---|---|
| POA | Login | Usable | Total | Increase | |||
| OFF | OFF | Cold | N/A | 46.4 | 12.3s | 58.97s | N/A |
| ON | Not started | Warm | 7.0s | 43.9s | 17.8s | 68.7s | 9.73s |
| ON | Started | Cold | 7.1s | 66.6s | 6.3s | 80.0s | 21.03s |
| ON | Completed | Cold | 7.0s | 59.4s | 11.1s | 77.5s | 18.53s |
Performing the same tests, under the same conditions, after initial encryption completes the overall boot time increase for SDE is 18.53 seconds.
If boot times are a top concern for your organization, this is going to definitely be CRISPY for you.
Comparative Boot Times Matrix
| Technology | Encryption State | Time to (in seconds) | ||||
|---|---|---|---|---|---|---|
| POA | Login | Usable | Total | Increase | ||
| FV2 | Completed | 10.0s | — | 83.9s | 93.9s | 34.93s |
| SDE | Completed | 7.0s | 59.4s | 11.1s | 77.5s | 18.53s |
| Variances | Completed | 3.0s | — | 24.5s | 16.4s | 16.4s |
The net result is that when a MacBook Pro released early 2011 starts from a cold boot with encryption, you should expect to see SDE perform 16.4 seconds faster than FV2.
Keep in mind that different models with different drive speeds, processor speeds and RAM will yield different results.
Recovery
Recovery is a hugely important capability with *any* encryption solution. It’s a horrible feeling when your data looks like it’s lost.
It’s even worse when you could have avoided it if using encryption and you lost your recovery key.
FV2: During the FV2 activation process, you will be presented with a recovery key. That key can either be stored with Apple or with yourself.
If stored with Apple, you will be asked to answer three security questions to encrypt the recovery key. Apple is quite clear that if you forget your answers, they are not responsible for recovering your key.

Storing the recovery key with Apple
I actually like this feature for non-technical home users that are good at remembering their security question and answers. CRISPY
If you choose to not store the recovery key with Apple, then put that 24 character, alpha-numeric string someplace safe and not on the same computer you encrypted.
Perhaps in the cloud?

Recovery provided with FileVault 2 when you forget your password
Let’s say for some reason in the future you need to change that recovery key, Apple provides that capability.
In order to change the recovery key you will need to fully decrypt your drive and fully encrypt your drive again. We already know that it takes 7 hours for encryption, to change the recovery key it will take roughly 14 hours. ROTTEN
For more information on OS X Lion Recovery, Apple wrote a really detailed and understandable article HT4718. In the event you only have one computer, my advice is to print it out today and file it.
You never know.
SDE: Password recovery keys are generated with SDE either in the GUI or the CLI and doesn’t require changing the encryption state.
This is especially handy for small to medium organizations or large enterprises that want to automate generating the recovery centrally.
In the event of boot failure, SDE has a pre-boot environment that can be used to authenticate to and used to recover encrypted data. CRISPY
Comparative: As critical as data and password recovery is for encrypted disks, Apple still has much growth in this area.
SDE provides a few methods for data and password recovery which is essential in the event one method isn’t successful.
Let’s face it. I can’t think of anyone who would volunteer to tell the CEO of their company that the encryption is the reason the family vacation photos are lost forever.
Reporting
It’s one thing to say your encrypted, it’s another to prove it.
FV2: As of this posting I couldn’t find a method for centralized reporting without scripting.
If someone out there really needs reporting, I found a command diskutil cs list which will provide status of the CoreStorage logical volume groups.
Grepping the command and redirecting the output to text file and massaging the output to meet your needs is plausible. The raw output on my MacBook Pro looked like this:
David-Schwartzbergs-MacBook-Pro:~ IluvNakeSec$ diskutil cs list

CoreStorage logical volume groups (1 found)

|

+-- Logical Volume Group 31D7AED9-6AE4-44B2-80A5-2CBE0E7AA4E6

=========================================================

Name: Macintosh HD

Sequence: 1

Free Space: 0 B (0 B)

|

+- Logical Volume Family A88A8F6F-AABC-4ADA-853E-7F1FC3F3D71D

----------------------------------------------------------

Sequence: 9

Encryption Status: Unlocked

Encryption Type: AES-XTS

Encryption Context: Present

Conversion Status: Complete

Has Encrypted Extents: Yes

Conversion Direction: -none-

|

+-> Logical Volume 34FB0CAC-800D-4222-9030-178AE32765B3

---------------------------------------------------

Disk: disk1

Status: Online

Sequence: 4

Size (Total): 498929332224 B (498.9 GB)

Size (Converted): -none-

Revertible: Yes (unlock and decryption required)

LV Name: Macintosh HD

Volume Name: Macintosh HD

Content Hint: Apple_HFS
The bolded line above which reads, “unlock and decryption required” is the indicator that FV2 is enabled.
While I like using command line and grepping, it goes against Apple’s history of technology being easy and just working. ROTTEN
SDE: While out of the box, SDE isn’t much better when it comes to reporting.
It’s better because the sgadmin command will yield the encryption status.
Volume info :

| Index | Name | UUID | State | Encrypted | Capacity |

| 0 | Macintosh HD | 5BE8216E-AF64-40B0-AA89-09FE5069EFC3 | Partially encrypted | 58.30 % | 300.1 GB |

| 1 | Data | D761FC9C-FB4C-42F2-9C7C-0BCCAC523013 | Encrypted | 100.00 % | 199.5 GB |
If CLI gets you down and you really want something more 21st Century. JAMF’s Recon Suite will provide reports in different formats including PDF.
When I last checked, Recon does support reporting for FileVault (notice the ‘2’ is missing). If you decide to use FV2 with Recon, I couldn’t find anything on their Support site so please contact JAMF directly to confirm supportability.
Comparative: Both SDE and FV2 fair about the same in the reporting category. The extra nudge forward goes to SDE for having better CLI options to provide encryption status without the need to grep the heck out of ASCII scrolling across Terminal.
I was also able to find logs (Yes LOGS!) of when SDE started and completed initial encryption (/var/logs/secure.log is your friend).
Miscellaneous
In an effort to reduce the length of this review (yeah I know, too late) I put down some additional thoughts covering other categories.
Security – A company called Passware has a product named Passware Kit Forensics v11 (cost $995) which analyzes a Mac’s live memory via FireWire even if the computer is locked or sleeping. It can even extract passwords in the Mac’s keychain password store; regardless of strength and with FV2 enabled. ROTTEN
As noted above, the defense is to turn off the computer when not in use, which Naked Security recommends.
Software Updates such as security updates and patches to Mac OS X are supported by both encryption solutions which is always CRISPY.
BootCamp support for FileVault 2 is available but according to a forum posting at Notebook Review there are some steps necessary before encryption on the Windows partition.
There are additional conversations happening on the BootCamp + FV2 topic in the Apple Support Communities.
SDE supports BootCamp, see article 112825 for details on setting it up.
Network User support for FileVault 2 is currently not available. In order to get a network user to access a locked FV2 drive, a local user needs to login first to unlock the disk. This is explained in Apple article HT4652.
Non-boot volumes can only be encrypted using the diskutil cs 'disk' -password 'password' command with FV2. The only documentation I found for additional internal volumes pointed to using Terminal.
SDE is able to encrypt additional volumes from the GUI or the CLI during deployment.
Updated: Thanks to a reader who reminded me about making a mention of how to add multiple users to the FV2 pre-boot authentication. User Provisioning is a big part of deploying any encryption solution.
FileVault 2 leverages the native user accounts to the operating system, which is cool.
Nonetheless, in order to add multiple users to the FV2 pre-boot authentication, the user needs to physically be there to enter their password. If they are not present during initial setup, then another user who can unlock the drive needs to later add that tardy user when present, assuming they can also change the FV2 settings in System Preferences. ROTTEN
SDE pre-boot users (one or more) can be added in the GUI or via the CLI during deployment without the user’s attendance as a requirement.
Closing remarks
In summary, Apple has joined the ranks of Microsoft by providing native operating system full disk encryption to the consumer market.
Congratulations for your hard work and efforts!
OS X 10.7 Lion FileVault 2 has some great features such as initial encryption speed, easy key recovery method for home users, ability to reboot during encryption or decryption process and you can change your mind if you started encrypting before your Time Machine backup or just chicken out.
FileVault 2 clearly falls into the shadows of Apple’s position of not catering to the corporate marketplace.
Which is fine because that is Apple’s choice and the majority of their customers love them for that philosophy.
For home users and small business owners with the need for encryption, paying $29.99 to upgrade to OS X 10.7 Lion is a steal.
Any organization looking at FV2 with the need for central management, network user support, central deployment, centralized reporting, high performance and strong security I heed a word of caution.
There are third party commercial alternatives which will meet your needs such as Sophos Disk Encryption.
For an interactive review of FileVault 2 between Chester Wisniewski and myself, plug into the Chet Chat 69 podcast.
Until next time, keep it safe and secure online.
Interviewed on Sophos Security Chet Chat 69
Chet Wisneiwski invited me to be a guest on his podcast Sophos Security Chet Chat for episode 69.
There was interesting news that week, especially the capture of Topiary from Lulz Security. Chet went through the news headlines and then moved on to interview me on my initial impressions of Mac OS X 10.7 Lion’s FileVault 2.
FileVault 2 is partition level encryption which replaces the previous version of file level encryption. My advice it to listen to the podcast first, and if the interview strikes a chord with you, then read my blog posting here at DSPN for more details.
Until next time, stay safe and secure online.
Can simple Google searches reveal your secrets?

My apologies for not doing a better job of keeping this blog a bit more current.
On July 5th, I posted a blog titled “Can simple Google searches reveal your secrets?” at Naked Security touching on how security information is available on public servers which are getting crawled by Google. This is not a jab at Google, but more of an awareness blog of how good security solutions can be compromised with bad security practices.
My recommendation is to revisit your security practices with a new pair of eyes. Hopefully you will gain from it.
I hope you enjoy the blog posting and please comment either here at DSPN or Naked Security. If you make a reasonable comment which invokes the need for me to reply, I will make every attempt to engage you in a conversation.
Until next time, keep it safe and secure online.
Sophos is a Platinum Sponser at SC Congress Canada
Sophos is a Platinum Sponser at the SC Magazine Congress in Toronto, Canada. I’ll be attending and looking forward to speaking with people on June 14th and 15th during the SC Congress in Toronto, Canada. Come by the booth to talk security or attend our session on “Where’s your data?”
For my impressions of the conference, please see my guest blog posting at Sophos Naked Security.

